
Baking Soda Clay Ornaments: An Easy DIY Craft for Kids
Some of the sweetest holiday decorations are the ones you make at home with simple ingredients and a little patience. These baking soda clay ornaments have a beautiful, porcelain-like finish, and you can create them with just baking soda, cornstarch, and water.
I love how versatile this project is. Kids can help cut out stars, hearts, trees, and circles, while lace, rosemary sprigs, or small stamps add delicate patterns to the surface. The finished ornaments look lovely on a Christmas tree, tied onto gift packages, or displayed around the house.
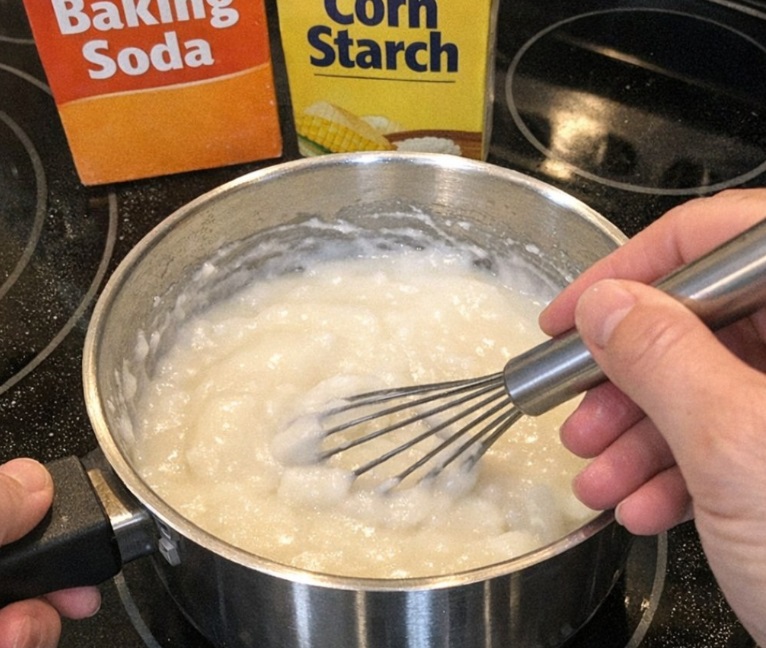
The secret to getting smooth, workable clay is to mix the ingredients in a cold saucepan before turning on the heat. Stir constantly as the mixture thickens, and remove it from the stove as soon as it forms a soft mound. With a little care, one batch can make around two dozen ornaments for a fun afternoon of crafting.
Materials
- 1 box baking soda, 16 ounces
- 1 cup cornstarch
- 3/4 cup water
- 1 medium saucepan, 2- to 3-quart size
- 1 wooden spoon or silicone spatula
- 1 dinner plate or small tray for cooling the clay
- 1 clean kitchen towel, lightly dampened
- 2 sheets parchment paper, about 12 x 16 inches each
- 1 rolling pin
- 4 to 6 cookie cutters, 2- to 3-inch sizes
- 1 paper or metal straw for punching hanging holes
- 1 lace doily, 1 small rubber stamp, or 3 to 4 rosemary sprigs for impressions
- 1 small bowl of cornstarch for dusting, about 2 tablespoons
- 1 piece fine sandpaper, 220-grit
- 6 to 8 yards baker’s twine or thin jute twine for hanging
- 6 to 12 small fresh or faux greenery sprigs for finishing, optional
Instructions
- Mix the ingredients. Add the baking soda, cornstarch, and water to a cold saucepan. Stir until the mixture is smooth and no dry pockets remain.
- Cook the clay. Place the saucepan over medium heat and stir constantly, scraping the bottom and sides. The mixture will quickly change from a milky liquid to a thick, mashed-potato-like consistency.
- Remove from the heat. As soon as the dough gathers into a soft mound and pulls away from the pan, take it off the heat. Avoid overcooking, which can make the clay dry and crumbly.
- Cool the dough. Transfer the hot dough to a plate and cover it with the lightly dampened towel. Let it cool for about 15 to 20 minutes, or until it is comfortable to handle.
- Knead until smooth. Knead the dough for 1 to 2 minutes until it feels soft and smooth. If it is sticky, lightly dust your hands and work surface with cornstarch.
- Roll it out. Place the clay on parchment paper and roll it to an even 1/4-inch thickness. Keeping the thickness consistent helps the ornaments dry evenly.
- Add decorative textures. Press a lace doily, rubber stamp, or rosemary sprig firmly into the surface. Lift it carefully to preserve the impression.
- Cut out the shapes. Use cookie cutters to make stars, hearts, trees, circles, or other designs. Arrange the cutters close together to make the most of the dough.
- Make hanging holes. Use a straw to punch a hole near the top of each ornament. Twist gently and check that the opening remains clear.
- Smooth the edges. Transfer the shapes on the parchment to a flat tray or baking sheet. Use a fingertip to smooth any rough or ragged edges.
- Dry the ornaments. Let them air-dry for about 2 days, turning them over after the first day. For a quicker option, bake them at 175°F for approximately 1 hour, checking that they dry without browning. Thicker ornaments may need additional drying time.
- Finish the edges. Once the ornaments are completely dry and cool, lightly sand any rough spots with 220-grit sandpaper.
- Decorate and hang. Leave the ornaments plain for a simple porcelain-inspired finish, or thread twine through each hole. Add a small sprig of greenery if desired.
Variations & Tips
- Make it kid-friendly: An adult should handle the hot saucepan and dough. Once the clay has cooled, children can help knead it, roll it out, choose cookie cutters, and press decorative patterns into the surface.
- Keep unused dough covered: Baking soda clay can begin drying while you work. Keep the portion you are not using under the damp towel, and roll out only part of the batch at a time.
- Create crisp impressions: Press lace, rosemary, or stamps firmly and evenly into the clay before cutting your shapes. A consistent 1/4-inch thickness helps the designs look neat.
- Try different shapes: Stars, hearts, Christmas trees, and simple circles all work well. Mixing several shapes makes the finished collection feel more personal.
- Choose your drying method: Air-drying takes longer but avoids the need for oven heat. The low-temperature oven method can speed things up, although drying time depends on the ornaments’ thickness and your oven.
- Keep the finish simple: These ornaments look especially pretty left white. A little twine and a small sprig of faux pine or rosemary add a natural touch without hiding the pressed details.
- Store them carefully: Keep completely dry ornaments flat in a sturdy box with tissue paper between layers. The clay is not waterproof, so use the ornaments indoors and protect them from moisture.
- Plan for gifts: One batch can make around two dozen ornaments, depending on the size of your cutters. If you need more for teacher gifts, family, or holiday packages, prepare two separate batches for easier mixing and cooking.
What to Remember
- Baking soda clay ornaments are an affordable way to make thoughtful, handmade decorations with the family. The ingredients are simple, and the finished pieces can look surprisingly delicate when rolled evenly and allowed to dry completely.
- For the best results, avoid overcooking the dough, keep unused clay covered, and give the ornaments enough time to dry before hanging or storing them. These are decorative crafts, not edible ornaments, and they should be kept away from young children who might put them in their mouths.
Frequently Asked Questions
How many ornaments does one batch make?
One batch can make approximately two dozen ornaments, depending on the size and shape of your cookie cutters and how closely you arrange them.
Why did my clay become crumbly?
The mixture may have cooked too long or lost too much moisture. Remove it from the heat as soon as it forms a soft mound, and cover it with a lightly dampened towel while it cools.
Can children make these ornaments?
Yes, children can help with rolling, cutting, and decorating once the dough has cooled. An adult should handle cooking and supervise the project.
Can I paint the ornaments?
You can experiment with acrylic craft paint after the ornaments are completely dry. Test one first, and allow the paint to dry fully before storing or hanging the pieces.
Are baking soda clay ornaments waterproof?
No. They can soften or become damaged when exposed to moisture, so they are best used indoors and stored in a dry place.
How long do the ornaments take to dry?
Air-drying usually takes about 2 days, although thicker shapes or humid conditions can extend the drying time. The low-oven method may be faster, but always check that the ornaments are fully dry before finishing them.
Final Thoughts
There is something special about making decorations from a few everyday ingredients and turning them into keepsakes. These baking soda clay ornaments are simple enough for a family afternoon but pretty enough to use as gift toppers or handmade holiday decorations.
Keep the designs simple, take your time with the drying process, and enjoy creating a collection that feels personal. With a little twine and a touch of greenery, each ornament becomes a small handmade detail worth bringing out year after year.