
DIY Red Glitter Poinsettia Ornament Made from Plastic Spoons
There’s something so satisfying about turning a handful of inexpensive dollar-store supplies into a holiday decoration that looks surprisingly elegant. This DIY red glitter poinsettia ornament starts with clear plastic spoons, a little hot glue, and plenty of sparkle, transforming simple materials into a flower-shaped decoration that catches the light beautifully.
I love crafts like this during the holiday season because they don’t require fancy tools or an expensive shopping list. With a little patience and a few layers of glittery petals, you can create something festive enough to hang on the Christmas tree, add to a wreath, or attach to a wrapped gift.
The finished ornament has a lovely layered look, with bright red glitter and golden beads at the center. It’s a fun afternoon project for anyone who enjoys budget-friendly Christmas decorations and wants to make something a little different from the usual store-bought ornaments.
Materials
- 24 clear plastic spoons, full-size
- 1 hot glue gun, high-temp or dual-temp
- 10 clear hot glue sticks, standard size
- 1 sheet parchment paper, about 12 x 16 inches
- 1/4 cup red glitter, fine or extra-fine
- 12 gold beads, 6 to 8 mm size
- 1 roll narrow ribbon, 1/8 to 1/4 inch wide
- Sharp scissors, 1 pair
Instructions
1. Prepare Your Crafting Area
Cover your work surface with parchment paper and plug in the hot glue gun. Arrange all 24 plastic spoons in rows with their bowls facing upward so you can work through them one at a time.
Keep the glue gun on a heat-safe surface, and be careful when handling hot glue.
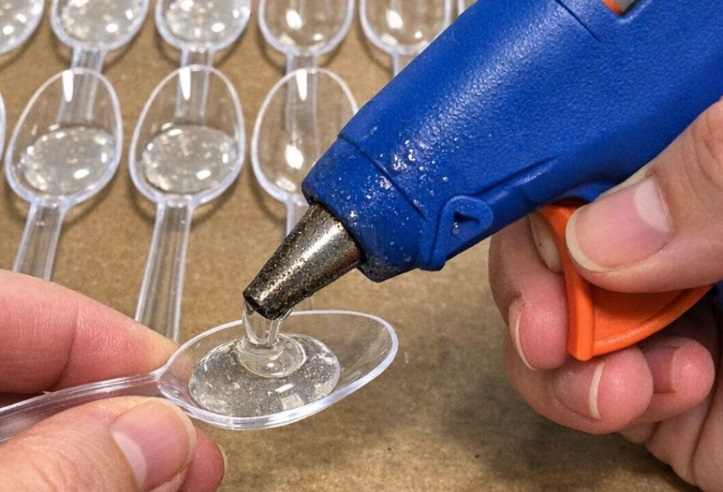
2. Fill the Spoon Bowls with Glue
Carefully squeeze hot glue into the bowl of each spoon, filling the rounded area almost to the rim with an even layer. Work slowly to help the glue settle smoothly rather than forming large lumps.
3. Add the Red Glitter
While the glue is still hot, generously sprinkle red glitter over each spoon bowl until the surface is completely covered. Allow the spoons to cool for 10–15 minutes, or until the glue has fully hardened.
4. Trim the Spoon Handles
Once the glue is firm, use sharp scissors to remove all 24 spoon handles. Cut close to each bowl without cracking the plastic.
The rounded, glitter-covered spoon bowls will become the petals of your poinsettia ornament.
5. Create the First Flower Layer
Arrange 8 spoon bowls in a circle, with their pointed ends meeting toward the center and their curved edges facing outward.
Add small, generous dots of hot glue where the pieces touch, then carefully press them together to create the bottom layer of petals.
6. Add the Second Layer
Take another 8 spoon bowls and arrange them in a second circle, positioning each petal between two petals from the first layer.
Glue this layer on top of the first, slightly overlapping the lower petals to give the flower a fuller appearance.
7. Build the Center Layer
Use the remaining 8 spoon bowls to form a smaller, more dimensional top layer. Angle the petals slightly upward toward the center and secure each one with hot glue.
Hold each piece in place for a few seconds until the glue sets. Work carefully so the flower maintains its shape.
8. Attach the Gold Beads
Glue the 12 gold beads in a close cluster at the center of the flower. These beads create a bright focal point that contrasts beautifully with the red glitter.
Allow the glue to set before moving the ornament.
9. Add the Hanging Ribbon
Cut a 7-inch length of narrow ribbon and fold it into a loop. Glue both ends securely to the back of the ornament.
For extra support, cover the ribbon ends with an additional trimmed spoon piece or a small amount of hot glue.
10. Finish and Hang Your Ornament
Allow the entire ornament to cool completely. Check the petals and add small dots of glue wherever any edges feel loose.
Gently tap away excess glitter, then hang your finished poinsettia ornament on the Christmas tree or use it to decorate a wreath or holiday gift.
Variations & Tips
- Try different colors: Swap the red glitter for silver, deep pink, gold, or iridescent glitter to create a different holiday look.
- Get better glitter coverage: Apply the glitter while the glue is still hot so it adheres well. Avoid pressing it with your fingers, as the glue can cause burns.
- Trim carefully: If the plastic cracks when cutting, remove the handle in two smaller cuts instead of trying to snip it off all at once.
- Strengthen the backing: Add a small felt circle or an extra piece of trimmed plastic over the ribbon attachment to help reinforce the hanger.
- Make a matching set: Create several ornaments with different glitter colors or bead combinations for a coordinated Christmas tree.
- Work safely: Hot glue and freshly cut plastic edges can cause injuries. Keep the glue gun away from children, and supervise children closely if they participate in the project.
Final Thoughts
This DIY red glitter poinsettia ornament is a lovely reminder that holiday decorating doesn’t have to cost much to look special. A few clear plastic spoons, some glitter, and a handful of gold beads can become a sparkling flower that adds personality to your Christmas decorations.
Make one as a simple afternoon craft or create a small collection to decorate your tree, wreath, or holiday packages. With its layered petals and festive colors, this homemade ornament is an inexpensive way to add a little handmade sparkle to the season.