
DIY Crystal Spoon Christmas Tree – Easy Dollar Store Holiday Craft
Holiday decorations don’t always have to come from an expensive store. Sometimes, a few inexpensive craft supplies can be turned into something surprisingly beautiful with a little patience and creativity.
This DIY Crystal Spoon Christmas Tree starts with clear plastic spoons, hot glue, and a simple foam cone. By filling the spoon bowls with clear glue and arranging them in overlapping layers, you can create a decorative tree with a crystal-like appearance. A light coating of silver glitter spray adds a festive finish that catches the light.
It’s a fun project for anyone who enjoys handmade Christmas decorations, budget-friendly DIY ideas, or creating something special for a holiday mantel or table. The process takes some time because each spoon is prepared individually, but the assembly is straightforward and doesn’t require advanced crafting skills.
Why You’ll Love This Crystal Spoon Craft
- Budget-friendly materials: Most of the supplies are easy to find at dollar stores or craft shops.
- Beautiful layered texture: The overlapping spoon pieces create the appearance of decorative petals.
- Customizable finish: Silver, pearl white, champagne, and icy blue are all lovely color choices.
- Great holiday display: Use it as a centerpiece, mantel decoration, or part of a seasonal display.
- Beginner-friendly: The project involves simple preparation and repetitive assembly rather than complicated techniques.
Materials You’ll Need
- 60 clear plastic spoons: Standard-size spoons with smooth, transparent bowls.
- 1 foam cone: Approximately 12 inches tall and 5 inches wide at the base.
- 1 hot glue gun: A full-size glue gun suitable for craft projects.
- 12 clear hot glue sticks: Approximately 4 inches each, depending on how much glue is used.
- 1 craft knife: For carefully trimming the spoon handles.
- 1 can silver glitter spray: Approximately 4–6 ounces.
- Parchment paper or freezer paper: To protect your work surface.
- 1 metal baking sheet or flat tray: Useful for holding the spoons while the glue cools.
- Work gloves or silicone finger protectors: Optional, but helpful when handling warm materials.
How to Make a DIY Crystal Spoon Christmas Tree
Step 1: Prepare Your Work Area
Cover your work surface with parchment paper or another suitable protective covering.
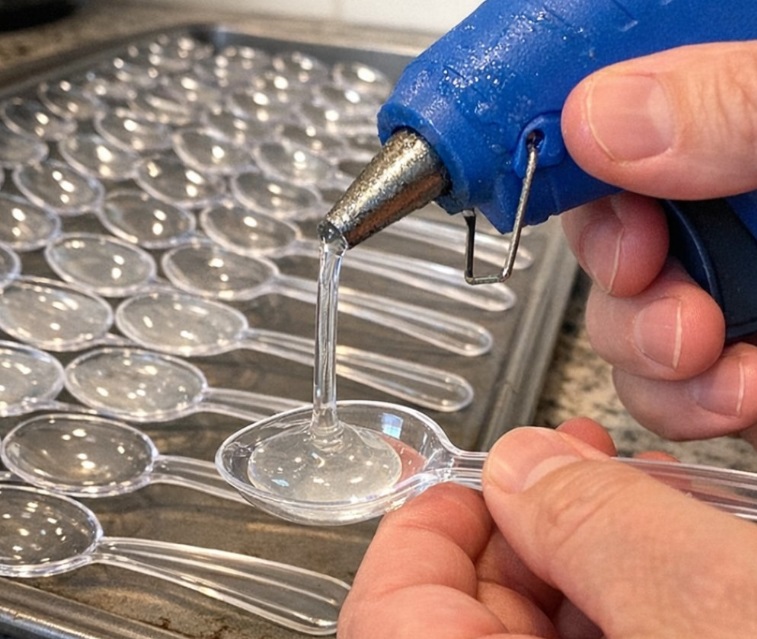
Arrange the 60 clear plastic spoons in rows on a flat baking sheet or tray. Keeping them organized makes it easier to work through the spoons without constantly moving them around.
Set your foam cone nearby so everything is ready for assembly.
Step 2: Fill the Spoon Bowls With Clear Glue
Heat your hot glue gun according to the manufacturer’s instructions.
Carefully squeeze clear hot glue into the bowl of each spoon, creating a smooth, rounded layer. Avoid overfilling, as excess glue can spill over the edges and create uneven pieces.
Step 3: Allow the Glue to Cool
Leave the filled spoons undisturbed for approximately 10–15 minutes, or until the glue has cooled and become firm.
Check that the glue is completely set before handling the spoons. Cooling time may vary depending on the amount of glue and the temperature of your work area.
Step 4: Remove the Spoon Handles
Once the glue has cooled, carefully trim the handles close to the base of each spoon bowl using a craft knife.
Work slowly on a stable cutting surface, keeping your hands away from the blade. You should now have separate rounded spoon pieces that will serve as the decorative petals.
Step 5: Attach the First Row to the Foam Cone
Start at the bottom edge of the foam cone.
Apply a small amount of hot glue to the back of each spoon piece and attach it around the cone. Position the rounded ends so they point outward and slightly upward.
Continue around the base until you have completed the first row.
Step 6: Add the Second Layer
Begin the next row slightly above the first one.
Overlap the lower row by approximately half an inch, positioning each new piece between two pieces underneath it. This arrangement helps hide the foam and creates a fuller, layered appearance.
Step 7: Continue Building the Tree
Keep attaching the spoon pieces in overlapping rows as you work toward the top of the cone.
Rotate the cone as you go to check that the spacing is consistent on all sides. Take your time with each row, especially around the narrower upper section.
Step 8: Finish the Top
As you approach the top of the cone, use the remaining spoon pieces to cover any visible foam.
Angle the final pieces slightly inward so the decoration has a neat, finished shape.
Allow the hot glue to cool completely before applying the decorative finish.
Step 9: Add Silver Glitter
Move the finished cone to a suitable outdoor or well-ventilated spraying area.
Following the glitter spray manufacturer’s instructions, apply a light, even coat over the entire decoration. Allow it to dry as directed before adding a second thin coat if needed.
Avoid spraying near flames, heat sources, or ignition sources. Keep the spray away from children and pets, and wear appropriate protection as directed on the product label.
Step 10: Display Your Finished Decoration
Once the finish is completely dry, place your crystal spoon tree on a holiday table, mantel, shelf, or entryway display.
It looks especially pretty near decorative lights or a window where natural and artificial light can reflect off the clear spoon centers.
Variations and Creative Ideas
- Add Extra Sparkle: If you enjoy a more glittery finish, use an additional decorative glitter product compatible with your spray finish. Follow its application instructions and allow everything to dry completely.
- Make a Fuller Tree: Use 70–75 spoons instead of 60 for denser coverage. You may also need additional glue sticks depending on your assembly technique.
- Try Different Colors: Silver gives the tree a classic winter appearance, while pearl white, champagne, and icy blue offer different holiday decorating styles.
- Create a Softer Shimmer: Apply a lighter coat of glitter spray to keep more of the clear spoon detail visible.
- Work in Batches: Prepare all the spoon pieces first, allow them to cool, and trim the handles before attaching them to the foam cone. This makes the assembly process easier to organize.
Helpful Tips for the Best Results
- Use clear spoons: Transparent spoon bowls help create the crystal-inspired appearance.
- Keep the glue consistent: Similar amounts of glue in each spoon make the finished decoration look more uniform.
- Don’t rush the cooling process: The glue should be completely firm before trimming or attaching the pieces.
- Check the spacing: Rotate the cone frequently to avoid large gaps on one side.
- Use small amounts of hot glue: Too much adhesive can become visible between the decorative pieces.
- Protect your workspace: Glitter spray can settle on nearby surfaces, so cover the surrounding area before applying it.
Safety Notes
A few simple precautions make this project easier and safer to complete.
- Hot glue can cause burns, so avoid touching fresh adhesive.
- Use a stable cutting surface when trimming the spoon handles.
- Keep your fingers clear of the craft knife and cut away from your body.
- Follow the spray product’s ventilation and protective equipment instructions.
- Allow all materials to cool and dry completely before moving the decoration.
- Keep small craft pieces and hot tools away from children and pets.
Where to Display Your Crystal Spoon Tree
Once finished, this decoration can become part of several holiday displays.
- Christmas mantel: Place it alongside candles, greenery, and other seasonal decorations.
- Dining table: Use it as part of a festive centerpiece, making sure it doesn’t interfere with serving dishes.
- Entryway table: Welcome guests with a handmade winter decoration.
- Bookshelf: Add it to a collection of small Christmas trees and seasonal ornaments.
- Window display: Position it where natural light can highlight the clear details.
A Pretty Holiday Decoration From Simple Supplies
This DIY Crystal Spoon Christmas Tree is a creative way to turn inexpensive plastic spoons and a few basic craft supplies into a decorative holiday piece.
The layered spoon petals give it an interesting texture, while the clear glue and silver finish create a sparkling winter-inspired look. It takes a little patience to prepare and assemble all the pieces, but the individual steps are simple enough to work through at your own pace.
Whether you make one for your own Christmas display or create several in different colors, this is a lovely project to add a handmade touch to your seasonal decorating.