
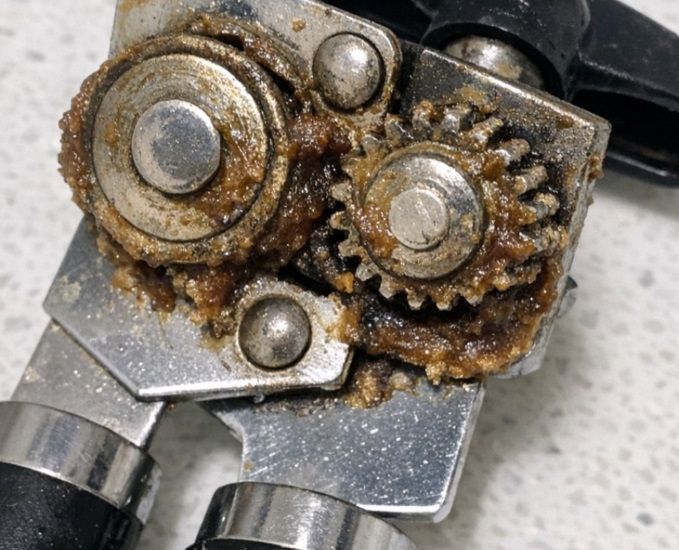
The Easy Nana Trick for Cleaning a Greasy, Sticky Can Opener
I grew up in a house where useful kitchen tools were never thrown away just because they looked a little worse for wear. My nana believed that most everyday messes had a simple solution, and she rarely reached for expensive cleaning products when ordinary household supplies would do the job.
Her can opener was a perfect example. The cutting wheel and gears would sometimes collect a stubborn brown, sticky buildup that seemed impossible to remove with an ordinary rinse. Instead of scrubbing endlessly, she used a simple combination of warm water, dish soap, and a little patience.
It’s a practical cleaning method that can help loosen old grease and food residue without unnecessary scrubbing. Here’s how to try it safely, what supplies you’ll need, and how to keep that sticky buildup from returning.
1. What Causes the Brown Buildup on a Can Opener?
That dark, sticky coating around a manual can opener usually comes from a combination of dried food particles, cooking grease, oils, and everyday kitchen dust.
The cutting wheel and gears are especially easy to overlook because they’re small and difficult to reach. Every time you open a can, tiny amounts of food residue can collect around these moving parts. If the opener isn’t cleaned and dried properly, the buildup becomes harder to remove.
That’s why a quick rinse often isn’t enough. The residue needs time to soften before you can clean it away.
2. The Simple Cleaning Trick
The method is straightforward: use warm water and grease-cutting dish soap to loosen the buildup, then carefully work the moving parts to help remove residue trapped around the gears.
You don’t need a collection of specialty cleaners or complicated tools. A small bowl, dish soap, warm water, and a soft toothbrush are usually enough.
One important thing to remember: not every can opener is designed to be soaked. Check the manufacturer’s cleaning instructions first, especially if yours has wooden handles, painted surfaces, or parts that could be damaged by prolonged moisture.
3. What You’ll Need
Gather these everyday supplies before getting started:
- A small bowl, mug, or narrow container
- Warm water
- 1 teaspoon grease-cutting dish soap
- A soft toothbrush
- A few cotton swabs
- A clean dish towel
White vinegar is optional, but it isn’t necessary for removing grease. Dish soap and warm water should be your main cleaning solution.
4. Why Warm Water and Dish Soap Work
Warm water helps soften greasy residue, making it easier to remove from the small spaces around the cutting wheel and gears.
Dish soap does most of the cleaning work. Its grease-cutting ingredients help lift oils and food residue so they can be rinsed away instead of remaining stuck to the metal.
Think about washing a greasy frying pan. Cold water alone often leaves an oily coating behind, while warm water and dish soap make the job much easier.
The same basic idea applies to your can opener. Giving the residue a little time to soften can save you from unnecessary scrubbing.
5. Should You Add White Vinegar?
Some people like adding a small splash of white vinegar to their cleaning water because it can help with certain mineral deposits and lingering odors.
However, vinegar isn’t the main ingredient responsible for cutting through grease. Dish soap is more important for this particular job.
If you decide to use vinegar, keep it modest and avoid prolonged contact with metal parts, particularly if your opener has a protective coating or contains materials that may react to acidic cleaners.
You can also skip it completely. Warm water and dish soap are a perfectly reasonable place to start.
6. Prepare the Can Opener for Cleaning
Before cleaning, check your can opener for loose parts, damaged handles, or signs of rust.
If the manufacturer allows soaking, prepare a small bowl of warm water with 1 teaspoon of dish soap. The water should be comfortably warm rather than boiling hot.
Position the can opener so the dirty cutting wheel and gear assembly can be cleaned without unnecessarily soaking the handles.
If your model isn’t suitable for immersion, don’t place it in the bowl. Instead, use a damp cloth and toothbrush to clean the affected areas carefully.
7. Let the Grease-Soaked Parts Loosen
For a can opener that is safe to soak, place the appropriate metal portion in the warm soapy solution for about 5 to 10 minutes.
This gives the dish soap time to work on the dried residue.
If your opener has wooden handles, painted sections, or delicate construction, avoid soaking it. A damp toothbrush and a little dish soap can be used instead.
Don’t force the handles or gears if they feel stiff. The goal is to loosen the buildup, not put extra pressure on an already worn mechanism.
8. Use the Moving Parts to Reach Hidden Areas
After the residue has softened, gently turn the handle if the mechanism moves freely.
This helps warm soapy water reach areas around the gear teeth and cutting wheel that are difficult to clean by hand.
You may notice brown or cloudy residue coming away into the water. That’s a good sign that the cleaning solution is lifting some of the accumulated grime.
If the water becomes particularly dirty, replace it with fresh warm soapy water before continuing.
9. Clean Around the Cutting Wheel With a Toothbrush
Now it’s time to deal with the remaining buildup.
Use a soft toothbrush to gently clean around the cutting wheel, gear teeth, and other accessible areas. A few careful strokes should help remove residue that has already softened.
Cotton swabs can be useful for reaching small corners, but avoid pushing fibers deep into the mechanism.
Stay away from steel wool, stiff wire brushes, and aggressive scraping tools. They can scratch surfaces or damage the cutting mechanism.
Also, be careful around the cutting edge. Even a small can opener blade can cause an unpleasant cut if handled carelessly.
10. Rinse Away All the Soap
Once the visible residue has been removed, wipe the opener with a clean cloth dampened with fresh water.
If your model is safe to rinse under running water, rinse it carefully while avoiding unnecessary water exposure to the handles and other vulnerable parts.
Make sure no soap remains around the gears or cutting wheel. Leftover cleaning solution can attract dust and leave a film of its own.
11. Dry the Can Opener Thoroughly
Drying is one of the most important parts of the process.
Use a clean dish towel to remove visible moisture from the cutting wheel, gears, and surrounding metal surfaces.
Open the handles and leave the can opener in a dry, well-ventilated place until all accessible areas are completely dry before storing it.
Moisture trapped around metal components can contribute to rust, particularly on older or lower-quality kitchen tools.
Never put a damp can opener straight back into a closed kitchen drawer.
12. What If the Brown Grime Is Still There?
Some can openers have years of accumulated residue, so one cleaning session may not remove everything.
Rather than scrubbing harder, repeat the warm soapy cleaning process. Use a soft toothbrush to work gently around the remaining buildup.
For stubborn spots, apply a little dish soap directly to a damp toothbrush and carefully clean the affected area.
Baking soda is another option for certain accessible surfaces, but use it cautiously. It can be mildly abrasive, so avoid rubbing it aggressively against delicate finishes or moving parts.
If the residue doesn’t loosen after repeated gentle cleaning, check whether the mechanism is damaged or corroded.
13. Common Cleaning Mistakes to Avoid
A few simple precautions can help protect your can opener while cleaning it.
- Don’t automatically put it in the dishwasher. Check the manufacturer’s instructions because some models may rust or become stiff after repeated dishwasher cycles.
- Avoid boiling water. Excessive heat may damage plastic handles, coatings, or older components.
- Don’t use bleach as a routine cleaner. It can damage metal and finishes.
- Never mix cleaning products. In particular, never combine vinegar with bleach.
- Avoid soaking wooden or delicate handles. Use a damp cloth instead.
- Don’t scrub with steel wool. It may scratch the surface and damage the mechanism.
- Never store it while damp. Make sure the gears and cutting wheel are dry first.
A little care during cleaning can help your kitchen tool last longer.
14. How Often Should You Clean a Can Opener?
A quick wipe after each use is a good habit, especially when opening cans containing sauces, sticky foods, or oily ingredients.
A more thorough cleaning can be done whenever you notice residue collecting around the cutting wheel or gears.
For a frequently used kitchen can opener, checking it every few weeks is a sensible routine. You may need to clean it more often if it regularly comes into contact with messy foods.
There’s no need to follow a strict monthly schedule if your opener stays clean. The important thing is not allowing food residue to build up for months.
15. How to Prevent the Sticky Brown Film From Returning
The easiest way to avoid another difficult cleaning session is to deal with residue before it dries.
After using the can opener:
- Wipe away any visible food residue.
- Clean the cutting wheel and accessible gear area with a damp cloth.
- Use a little dish soap if the opener feels greasy.
- Remove soap with a clean damp cloth.
- Dry the opener thoroughly before putting it away.
It’s also helpful to store the can opener in a dry drawer, away from damp dishcloths and water splashes.
These small habits take very little time but can make a noticeable difference.
16. When Should You Replace Your Can Opener?
Cleaning can remove grease and food residue, but it cannot repair a damaged cutting mechanism.
Consider replacing your can opener if:
- The cutting wheel is badly rusted or pitted.
- The gears slip or refuse to turn properly.
- The handles or rivets feel loose.
- It repeatedly tears lids instead of cutting smoothly.
- It leaves dangerously jagged edges.
- The mechanism remains stiff after proper cleaning.
A clean can opener should also be a safe one. If the cutting wheel or gears are damaged, replacing the tool is usually the better choice.
Final Thoughts
My nana always believed that useful things deserved a little care before being thrown away. Her approach to cleaning the can opener was simple: loosen the mess first, clean gently, and never put a damp tool back in the drawer.
Warm water, a little dish soap, and a soft toothbrush can make a stubborn cleaning job much easier. You may not need a special product or a lot of scrubbing to get rid of that unpleasant brown buildup.
The next time you notice sticky residue around your can opener, give it a careful cleaning before deciding it’s time for a replacement. Sometimes the simplest kitchen tricks are the ones worth keeping.