
Homemade Strawberry Jam with Lemon Seeds
Homemade strawberry jam is one of those simple kitchen favorites that makes breakfast feel a little more special. Made with fresh strawberries, sugar, and lemon juice, this recipe creates a sweet, fruity spread with a lovely homemade flavor.
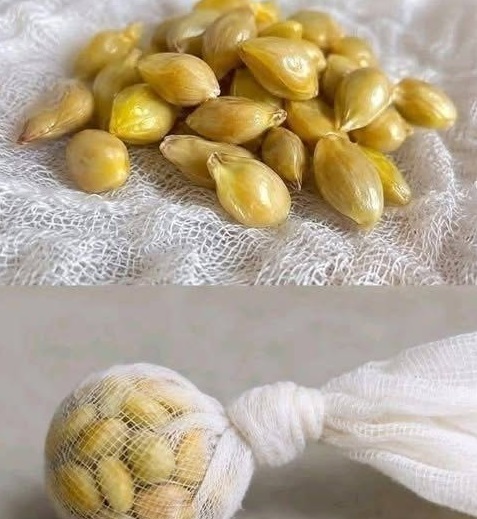
The interesting part of this recipe is the use of fresh lemon seeds. Instead of adding commercial pectin, the seeds are wrapped in a small piece of cheesecloth and simmered with the strawberries. They are removed before the jam is transferred to jars, leaving behind a smooth fruit spread without hard seeds.
Enjoy this strawberry jam on warm toast, biscuits, pancakes, or freshly baked bread. It takes a little patience while the fruit cooks and sets, but the preparation itself is simple and uses just a handful of ingredients.
Recipe Details
- Prep Time: 20 minutes
- Cook Time: 35 minutes
- Macerating Time: 1 hour
- Cooling Time: About 2 hours
- Total Time: Approximately 4 hours
- Yield: About four 8-ounce jars
- Course: Breakfast, Spread
- Cuisine: American
- Cooking Method: Stovetop
Ingredients
- 4 cups fresh strawberries, hulled and quartered (about 2 pounds)
- 3 cups granulated sugar
- 3 tablespoons fresh lemon juice
- 3 tablespoons fresh lemon seeds, collected from approximately 4–6 lemons
- 1 small piece of cheesecloth (about 6 × 6 inches)
- Kitchen twine
Directions
1. Prepare the Lemon Seeds
Collect the lemon seeds and rinse them thoroughly in a fine-mesh strainer to remove any remaining pulp.
Place the seeds in the center of the cheesecloth. Gather the corners and tie them securely with kitchen twine to make a small pouch. Set aside.
2. Combine the Strawberries and Sugar
Place the quartered strawberries and granulated sugar in a large, heavy-bottomed pot.
Add the lemon juice and place the prepared lemon seed pouch in the mixture. Stir gently to combine.
Cover the pot and let the fruit sit for about 1 hour at room temperature, stirring occasionally. This allows the strawberries to release their juices and gives the sugar time to dissolve.
3. Cook the Strawberry Mixture
Place the pot over medium heat. Stir gently until the sugar has dissolved into the strawberry juices.
Bring the mixture to a boil, stirring frequently to prevent sticking. Reduce the heat slightly and continue cooking uncovered for approximately 30–35 minutes.
Stir regularly and remove any foam that forms on the surface. The strawberries will soften as the mixture cooks, and the liquid will gradually become thicker.
Keep the lemon seed pouch in the pot during cooking so it can release some of its natural pectin.
4. Test the Jam for Setting
Before cooking, place a small ceramic plate in the freezer for about 5 minutes.
To check whether the jam is ready, spoon a little onto the chilled plate and let it sit for approximately 60 seconds.
Gently push the jam with your finger or a spoon. If the surface wrinkles slightly and the jam moves slowly, it may be ready. If it remains runny, continue cooking for another 5 minutes and test again.
5. Remove the Seeds and Fill the Jars
Remove the pot from the heat and carefully take out the cheesecloth pouch. Discard the lemon seeds.
Let the jam rest for about 5 minutes, then transfer it into clean, suitable food-storage jars or containers. Leave a little space at the top, especially if you plan to freeze it.
Allow the jam to cool before covering and refrigerating or freezing it.
Variations & Tips
- Choose ripe strawberries: Fresh, ripe strawberries provide the best flavor and natural sweetness.
- Cut the fruit evenly: Quartering the strawberries helps them cook more evenly.
- Watch the heat: Keep the mixture at a steady boil without allowing it to scorch. Stir regularly, especially as the jam thickens.
- Secure the cheesecloth: Tie the pouch tightly so the lemon seeds stay inside throughout cooking.
- Adjust the texture: Cook a little longer if you prefer a thicker jam, testing regularly to avoid overcooking.
- Use fresh lemon juice: Freshly squeezed lemon juice adds brightness and balances the sweetness of the strawberries.
What to Serve With Strawberry Jam
This homemade strawberry jam is easy to enjoy in several ways:
- Toast: Spread it over warm buttered toast for a simple breakfast.
- Biscuits: Serve with freshly baked homemade biscuits.
- Pancakes: Add a spoonful over pancakes or waffles.
- English Muffins: Spread over toasted English muffins with a little butter.
- Yogurt: Swirl some jam into plain yogurt for a fruity snack.
- Peanut Butter Sandwiches: Use it as a sweet filling for a classic sandwich.
Storage & Reheating
- Once the jam has cooled, transfer it to clean, airtight containers and refrigerate promptly.
- Refrigerator: Keep the jam refrigerated at 40°F (4°C) or below and use within approximately 3 weeks.
- Freezer: For longer storage, freeze the jam in freezer-safe containers, leaving room for expansion. Thaw in the refrigerator before using.
- After opening: Always use a clean spoon and return the container to the refrigerator promptly.
Important: This recipe uses a refrigerator/freezer storage method. Filling jars with hot jam and closing the lids does not make the jars shelf-stable. Do not store these jars in the pantry. For room-temperature storage, use a scientifically tested canning recipe and follow its specified boiling-water processing instructions.
Frequently Asked Questions
Can I make strawberry jam without commercial pectin?
Yes. This recipe uses lemon seeds during cooking instead of adding commercial pectin. The seeds are placed in a cheesecloth pouch and removed before storing the jam.
Why are lemon seeds added to strawberry jam?
Lemon seeds can contribute natural pectin during cooking, which may help the fruit mixture thicken. The cheesecloth keeps the seeds out of the finished spread.
Do I need to remove the strawberry seeds?
No. The small seeds naturally found in strawberries can remain in the jam. Only the lemon seeds need to be removed with the cheesecloth pouch.
How do I know when the jam is ready?
Use the chilled plate test. Place a small spoonful of jam on a cold plate, wait about 60 seconds, and gently push it. A slight wrinkle on the surface is a sign that the jam may have reached its setting point.
Can I use frozen strawberries?
Yes, thawed strawberries can be used. Drain any excessive liquid before cooking and remember that the final cooking time may vary depending on how much moisture the fruit releases.
Why is my strawberry jam still runny?
The jam may need additional cooking time. The amount of natural pectin in the fruit and the moisture released during cooking can affect the final texture. Continue cooking in short intervals and test again.
Final Thoughts
Making strawberry jam at home is a lovely way to enjoy the flavor of fresh fruit in a simple homemade spread. The combination of strawberries, sugar, and lemon juice creates a sweet and slightly tangy jam, while the lemon seed pouch offers an interesting alternative to commercial pectin.
Serve it with toast, biscuits, pancakes, or your favorite breakfast treats. Once you have a jar ready in the refrigerator, you’ll have a delicious homemade addition to enjoy throughout the week.