
DIY Hot Glue Icicle Chandelier Tree
Holiday decorations do not always need to come from an expensive store to make a beautiful impression. With a few everyday craft supplies, a little patience, and a hot glue gun, you can create something surprisingly elegant. This DIY hot glue icicle chandelier is a perfect example. Individual drops and lines of clear glue turn into delicate icicles that catch the light and give the finished decoration a lovely frosty appearance.
What makes this project especially fun is the way it comes together. You make the icicles separately, attach them to three embroidery hoops, and finish everything with warm white fairy lights. The different lengths create a layered, hanging chandelier effect that looks much more complicated than it actually is.
I especially like that you can work on this project a little at a time. Make the glue icicles one afternoon, assemble the hoops later, and add the lights when everything is ready. Once it is hanging in place, it makes a lovely decoration for a dining room, entryway, covered porch, or a special holiday corner. Here is how to make one from start to finish.
Why You’ll Love This DIY Icicle Chandelier
- Budget-friendly supplies: The project uses basic craft materials, including clear glue sticks, wax paper, embroidery hoops, and fishing line.
- A beautiful finished effect: The transparent icicles reflect the fairy lights and create a soft winter-inspired glow.
- Easy to make in stages: You do not have to finish everything in one sitting. The icicles can be prepared ahead of time.
- Customizable design: You can change the hoop colors, icicle lengths, and lighting to suit your holiday decorations.
- Lightweight decoration: The finished chandelier is easy to move and display when it is assembled and hung securely.
Project Details
- Project Type: DIY Holiday Decoration
- Difficulty: Easy to Moderate
- Preparation Time: About 45–60 minutes
- Assembly Time: About 1–2 hours
- Total Time: Approximately 2–3 hours, plus cooling and drying time
- Main Materials: Hot glue, wax paper, embroidery hoops, fishing line, and fairy lights
- Finished Style: Hanging winter-inspired chandelier
Materials
Before beginning, gather everything you need and set up a clean, heat-resistant work area. Having the hoops, fishing line, and glue icicles ready will make the assembly process much easier.
- 1 full-size hot glue gun
- 24 clear full-size glue sticks, 4 inches each
- 6 sheets wax paper, 12 x 18 inches each
- 1 embroidery hoop, 12 inches diameter
- 1 embroidery hoop, 10 inches diameter
- 1 embroidery hoop, 8 inches diameter
- 1 spool clear fishing line, 10 lb test, at least 25 feet
- 1 strand warm white battery-operated fairy lights, 16 to 20 feet long, 100 to 150 lights
- 1 pair scissors
- 1 ruler
- 1 fine-tip marker for sketching guide lines on the dull side of wax paper
- 1 clear adhesive hook or ceiling hook for hanging
- 1 small ribbon, 24 inches long, optional for the top hanging loop
- 1 set fresh batteries for the fairy lights
How to Make a Hot Glue Icicle Chandelier
Step 1: Prepare the Wax Paper
Start by arranging all 6 sheets of wax paper across your counter. Tape the sheets side by side so they stay in place while you work.
Using a ruler and fine-tip marker, draw long, tapered icicle shapes on the dull side of the wax paper. Make them different lengths, ranging from 8 to 16 inches long and approximately 1/4 to 3/4 inch wide.
There is no need to make every line perfectly straight. Natural-looking curves and slight variations will give the finished icicles a more realistic appearance.
Step 2: Pipe the Hot Glue Icicles
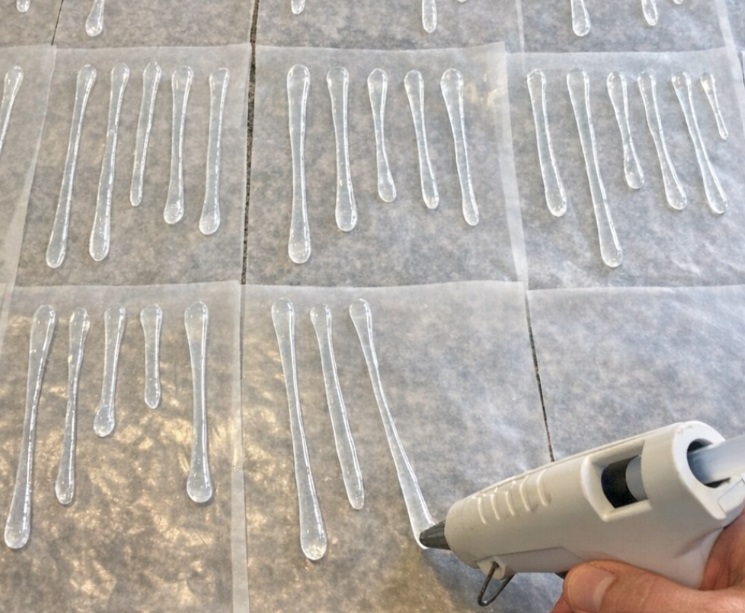
Allow your glue gun to heat fully before starting. Slowly squeeze clear hot glue directly over each guide line, following the shape you have drawn.
Try to keep the top of each icicle a little thicker while allowing the bottom to narrow into a delicate point. Slightly wavy shapes will look more interesting than perfectly straight lines.
Work carefully and avoid touching freshly applied glue. It can remain very hot even when it begins to look clear.
Clear hot glue icicles piped onto wax paper in long tapered shapes
Clear hot glue icicles piped onto wax paper in long tapered shapes
Step 3: Make Enough Icicles for All Three Tiers
Continue making icicles until you have approximately 55 to 70 pieces.
For a balanced chandelier, aim for:
- Around 28 long icicles
- Around 22 medium icicles
- Around 10 to 20 shorter filler pieces
The different lengths are important because they help create the layered, tapered appearance. Making a few extra pieces is also helpful because you can use them later to fill any empty spaces.
Step 3: Make Enough Icicles for All Three Tiers
Continue making icicles until you have approximately 55 to 70 pieces.
For a balanced chandelier, aim for:
Around 28 long icicles
Around 22 medium icicles
Around 10 to 20 shorter filler pieces
The different lengths are important because they help create the layered, tapered appearance. Making a few extra pieces is also helpful because you can use them later to fill any empty spaces.
Step 4: Let the Glue Cool and Remove the Icicles
Leave the glue shapes on the wax paper for about 10 minutes, or until they have cooled and hardened completely.
Once they are ready, gently peel each icicle away from the wax paper. Take your time so the thinner sections do not bend or tear.
Use scissors to remove any long, stringy glue threads or uneven edges. Set the finished pieces aside in separate groups according to their lengths.
Step 5: Prepare the Embroidery Hoops
Separate the three embroidery hoops and remove the inner rings if needed. Keep the smooth outer rings for the chandelier structure.
Arrange them from largest to smallest:
- 12-inch hoop for the top tier
- 10-inch hoop for the middle tier
- 8-inch hoop for the bottom tier
These graduated sizes will help create the shape of a hanging chandelier. If you prefer a more decorative finish, you can paint the hoops before assembly, but allow the paint to dry completely first.
Step 6: Create the Main Hanging Point
Cut 3 pieces of fishing line, each 24 inches long.
Tie the three pieces evenly around the 12-inch hoop, spacing them approximately the same distance apart. Bring their loose ends together above the hoop and knot them securely about 8 inches above the ring.
This creates the main hanging point and helps keep the largest hoop balanced.
Largest embroidery hoop suspended with three fishing line hangers
Largest embroidery hoop suspended with three fishing line hangers
Step 7: Attach the Middle Hoop
Cut 3 more pieces of fishing line, each 7 inches long.
Use them to connect the 10-inch hoop beneath the largest hoop. Space the ties evenly around both rings so the middle hoop hangs directly below the top one.
Before moving on, check that the second hoop is level. Adjust the fishing line if one side hangs lower than the others.
Step 8: Attach the Smallest Hoop
Repeat the same process with another 3 pieces of fishing line, each 7 inches long.
Tie the 8-inch hoop beneath the middle hoop, keeping it centered. Look at the structure from several directions to make sure all three rings line up properly.
At this stage, you should have a three-tier frame with the largest hoop at the top and the smallest one at the bottom.
Step 9: Add Icicles to the Largest Hoop
Cut short pieces of fishing line, approximately 3 to 5 inches long, to hang the glue icicles.
Tie one icicle at a time around the 12-inch hoop. Mix the longer and medium pieces as you work around the entire ring.
Place them fairly close together so the outer tier looks full. Try not to arrange every icicle at exactly the same height; a little variation will make the chandelier look softer and more natural.
Step 10: Decorate the Middle Tier
Move to the 10-inch hoop and begin attaching more glue icicles.
For this section, use a combination of medium and shorter pieces. Keep the average length slightly shorter than the icicles on the outer ring.
This gradual change in length helps the chandelier take on its tapered shape. Continue working around the entire hoop, leaving as few large gaps as possible.
Step 11: Fill the Smallest Hoop
Use the shortest and most delicate icicles on the 8-inch hoop.
Attach them around the ring, keeping the pieces evenly distributed. Then add one extra-long icicle to the center, allowing it to hang straight down.
That central piece creates a simple finishing detail and gives the whole decoration a more complete appearance.
Three-tier hoop chandelier covered with clear glue icicles before lights are added
Three-tier hoop chandelier covered with clear glue icicles before lights are added
Step 12: Fill Any Empty Spaces
Take a few minutes to inspect the chandelier from every angle.
If you notice areas that look too open, use the remaining short icicles to fill them. You can overlap some of the hanging lengths slightly to create a fuller effect.
This is a good time to adjust any pieces that look out of place. A balanced arrangement will make the finished decoration look attractive whether you view it from the front, side, or underneath.
Step 13: Add the Fairy Lights
Once the icicles are in place, take your warm white battery-operated fairy lights and begin wrapping them around the top hoop.
Continue the wire down through the middle and smallest hoops, creating a loose spiral as you go. Keep the wire close to the fishing-line supports where possible so it blends into the structure.
Arrange the lights so they shine through the clear glue pieces. Avoid pulling the wire too tightly or allowing it to press against delicate icicles.
Step 14: Hide the Battery Pack
Bring the battery pack up toward the top hanging knot. Use a little fishing line or ribbon to secure it neatly in place.
Make sure the switch remains accessible so you can turn the lights on and off without taking down the decoration.
If you use ribbon for the top loop, choose a color that works with your holiday decor. A simple white, silver, or neutral ribbon will keep the overall look understated.
Step 15: Hang and Adjust the Finished Chandelier
Attach the finished piece to a suitable ceiling hook or a strong adhesive hook specifically rated for overhead decorations.
Turn on the fairy lights and gently rotate the hoops until the icicles hang evenly. Check the arrangement from all sides and make any final adjustments.
Once everything is balanced, the clear glue pieces should catch the warm light and create a lovely sparkling effect.
Finished glowing icicle hoop chandelier tree hanging in a cozy home corner
Finished glowing icicle hoop chandelier tree hanging in a cozy home corner
Variations and Helpful Tips
Make It Fuller and More Dramatic
For a fuller chandelier, prepare closer to 70 icicles rather than stopping at 55. Having extra pieces gives you more flexibility when decorating the hoops and makes it easier to cover empty areas.
Keep the Colors Simple
Clear glue paired with warm white fairy lights creates a soft winter look that works with many holiday decorating styles. If you want a little extra sparkle, you can add a few small crystal beads to selected fishing-line ties.
Avoid Too Many Glue Strings
If your glue gun produces a lot of thin strings, make sure it has heated fully before you begin. Work slowly and allow the glue to cool completely before removing the icicles. Any remaining threads can be trimmed carefully with scissors.
Give Each Icicle a Stronger Top
When piping the glue, make the upper section slightly thicker and taper the shape toward the bottom. The thicker top gives the fishing line a sturdier area to support when the icicle is hanging.
Change the Hoop Finish
Natural wood hoops give the chandelier a simple, understated appearance. For a more festive finish, paint them white, silver, or champagne. Just remember to let the paint dry completely before attaching the fishing line.
Choose a Secure Hanging Location
Although the decoration is relatively lightweight, it should still be attached to a sturdy ceiling hook or a strong adhesive hook rated for overhead decor. Keep it away from heat vents and other heat sources. If children or pets are around, hang it somewhere they cannot pull on the delicate pieces.
Store It Carefully
When the holiday season is over, avoid squeezing the chandelier into a small box. Hanging it from a sturdy hanger or hook in a closet can help prevent the icicles from tangling. If you need to cover it, use a loose protective covering rather than wrapping it tightly.
Where to Display Your Hot Glue Icicle Chandelier
This decoration works especially well in places where it has room to hang freely.
- Dining room: Hang it above a holiday table, making sure it is high enough not to interfere with anyone sitting underneath.
- Entryway: Use it as a welcoming winter decoration near the entrance.
- Covered porch: Display it in a protected area away from wind, moisture, and extreme temperatures.
- Holiday decorating corner: Pair it with white branches, silver ornaments, or other winter-inspired decorations.
- Living room: Hang it in a suitable open space where the fairy lights can be enjoyed in the evening.
Frequently Asked Questions
Can I use regular hot glue sticks for this project?
Clear hot glue sticks are best because they allow the fairy lights to shine through the finished icicles. Colored or opaque glue will create a different look and may not produce the same transparent effect.
How many icicles should I make?
Plan on approximately 55 to 70 pieces. A combination of long, medium, and short icicles will help the three tiers look full and balanced.
Do I need three different embroidery hoop sizes?
For this particular design, the 12-inch, 10-inch, and 8-inch hoops create the graduated chandelier shape. You can experiment with other sizes, but keeping them progressively smaller helps maintain the same overall appearance.
Can I make the icicles ahead of time?
Yes. You can prepare all the glue icicles in advance and keep them separated by length until you are ready to assemble the chandelier. Store them somewhere they will not be crushed or exposed to excessive heat.
Why are some of my icicles bending?
Very thin glue shapes may bend under their own weight, especially when they are long. Try making the upper section thicker and tapering the bottom more gradually. Allow each piece to cool completely before handling it.
Can I use battery-operated fairy lights?
Yes. The project is designed for a battery-operated strand of warm white fairy lights, approximately 16 to 20 feet long with 100 to 150 lights. Keep the battery pack accessible and follow the manufacturer’s instructions for use.
Is this decoration suitable for outdoor use?
It is best displayed indoors or in a fully protected covered area. Moisture, wind, and temperature changes can affect the glue pieces and the lights. Always check that the lighting is suitable for the location.
Final Thoughts
This hot glue icicle chandelier is one of those holiday projects that proves a few inexpensive supplies can become something really special. The individual icicles are simple to make, but once they are attached to the three hoops and illuminated with fairy lights, the whole decoration takes on a completely different look.
I also love that there is room to make it your own. You can keep the design simple with natural wood and warm white lights, or add a little silver and sparkle for a more festive finish. Take your time arranging the icicles, especially around the three tiers, because those small details make a big difference in the finished appearance.
Whether you hang it in an entryway, dining room, or a cozy holiday corner, this DIY chandelier brings a little winter magic into the home without requiring expensive decorations or complicated crafting skills.