
DIY Christmas Tree Made From Old Christmas Cards
After Christmas, it’s easy to end up with a little collection of greeting cards that are too pretty to throw away. Many have beautiful artwork, festive colors, and patterns that deserve to be enjoyed a little longer. Instead of packing them away or sending them to the recycling bin, you can turn them into something completely different with this charming DIY Christmas tree made from old Christmas cards.
This project uses simple paper-rolling and gluing techniques to create a decorative tabletop tree with plenty of texture. Each rolled piece adds another layer of color and pattern, giving the finished decoration a collected, almost vintage appearance. Red, green, gold, snowy white, and all those familiar holiday illustrations come together in a way that makes every tree look a little different.
I especially like crafts that make use of supplies already sitting in a drawer or craft box. You don’t need expensive materials or complicated equipment for this one. A cardboard cone, a wooden skewer, some glue, and a stack of old Christmas cards are enough to get started. It is a relaxing project for an afternoon at home, and the finished tree looks lovely on a mantel, side table, or holiday display.
Why You’ll Love This Christmas Card Craft
A creative way to reuse old cards: Instead of discarding holiday cards, you can turn their artwork and colors into a new seasonal decoration.
Simple materials: Most of the supplies are inexpensive and easy to find at home or in a craft store.
Beginner-friendly technique: The project mainly involves rolling paper tubes, gluing them together, and arranging them around a cone.
A unique handmade decoration: No two finished trees need to look exactly alike because every collection of Christmas cards has different designs.
Lovely for holiday decorating: The finished piece can be displayed on a mantel, bookshelf, entryway table, or holiday sideboard.
Easy to personalize: You can arrange the colors, choose different cone heights, or make several trees for a coordinated display.
Project Details
- Project Name: DIY Christmas Tree Made From Old Christmas Cards
- Project Type: Christmas Craft / Recycled Paper DIY
- Skill Level: Beginner
- Estimated Time: Approximately 2–3 hours, depending on your rolling and gluing speed
- Main Technique: Paper rolling and hot gluing
- Finished Size: Approximately 10–12 inches tall
- Best For: Christmas decorating, recycled crafts, and handmade holiday projects
Materials You’ll Need
One of the nicest things about this project is that the supply list is short. Before beginning, gather everything together so you can work comfortably without stopping to look for tools.
- 60 old Christmas cards: Standard 5 x 7-inch cards or similar sizes work well. Choose a mixture of red, green, white, gold, and patterned designs for a colorful finished tree.
- 1 wooden skewer: A skewer measuring 10 to 12 inches long helps you roll the cards into narrow paper tubes.
- 1 full-size glue stick: Approximately 0.74 ounce, used to secure the paper tubes after rolling.
- 1 hot glue gun: You’ll also need 3 full-size glue sticks to attach the rolled cards securely to the cardboard cone.
- 1 cardboard cone: Choose a cone approximately 10 to 12 inches tall and 4 to 5 inches wide at the base.
You may also want a pair of scissors nearby for general preparation, although the original design works by overlapping the rolled tubes rather than trimming them to create the tapered shape.
The basic supplies needed to make a decorative Christmas tree from old greeting cards.
How to Make a Christmas Tree From Old Christmas Cards
The process is easier than the finished decoration might suggest. You’ll spend most of your time rolling the cards into tubes and attaching them around the cone. Working in small sections makes the project more manageable and helps keep everything in place.
Step 1: Choose and Sort the Christmas Cards
Begin by going through your old Christmas cards and selecting approximately 60 pieces. Look for a good mixture of colors, illustrations, and printed patterns.
Cards with red, green, gold, cream, and white details work especially well because they create a traditional holiday color palette. You can mix busy patterns with simpler designs to keep the finished tree visually interesting.
Set the selected cards aside in a small stack so they are easy to reach as you work.
Step 2: Start Rolling the Cards
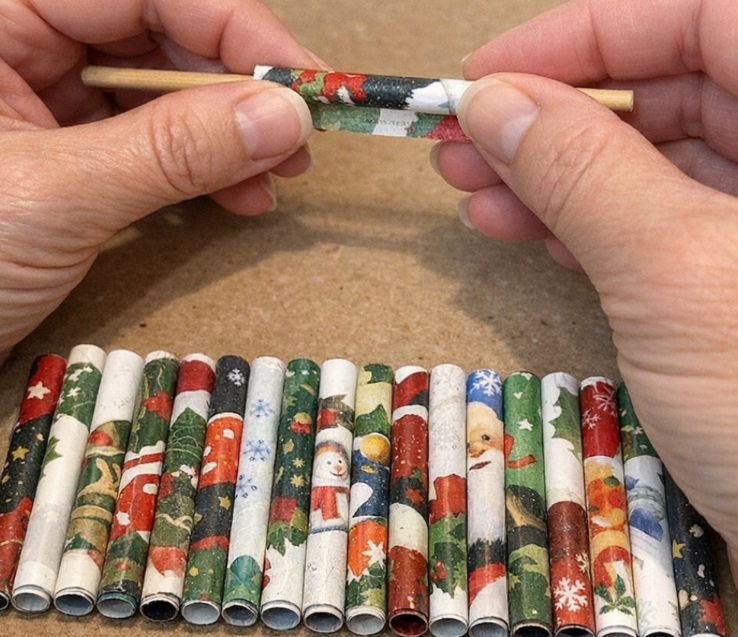
Open each card flat and place it printed-side down on your work surface. Take the wooden skewer and position it diagonally across one corner of the card.
Begin rolling the paper tightly around the skewer, keeping the angle consistent as you move across the card. A diagonal roll helps create a long, narrow tube that can be attached vertically to the cone.
The wooden skewer helps form a tight paper tube from each Christmas card.
Step 3: Secure Each Paper Tube
Continue rolling until the card forms a long, firm tube. When you reach the final edge, apply glue stick along approximately the last 2 inches of the paper.
Press the edge down firmly and hold it for a few seconds so the tube stays closed. Try to keep the roll tight and neat, since loose tubes can be harder to attach evenly to the cone.
Step 4: Make the Remaining Tubes
Slide the wooden skewer out carefully and set the finished tube aside.
Repeat the same process with the remaining cards until you have approximately 60 rolled tubes. Don’t worry if a few turn out slightly shorter than the others. Shorter pieces can be useful when you reach the narrower upper portion of the tree.
If you have additional cards available, making 8 to 12 extra tubes is a helpful idea. They can be used later to fill small spaces and create fuller coverage.
Step 5: Prepare the Cardboard Cone
Place the cardboard cone upright on a stable work surface. Make sure it stands straight before you begin attaching the paper tubes.
Starting at the bottom, apply a narrow line of hot glue to a small section of the cone, working on approximately 2 inches at a time. This helps prevent the glue from cooling before you have a chance to position the tubes.
Be careful when working with hot glue, and avoid touching the fresh adhesive directly.
Step 6: Attach the First Row of Tubes
Take your first group of rolled cards and begin attaching them vertically around the bottom edge of the cone.
Position the wider ends toward the base and arrange the tubes side by side. Press each one gently into the glue, leaving as little space between them as possible.
Continue around the entire base until the first row forms a full decorative border.
The first row of rolled Christmas cards creates the foundation of the tree.
Step 7: Build the Tree Upward
Once the bottom row is secure, continue attaching more tubes above it.
Work in small sections, applying hot glue and pressing each tube into place. Stagger the seams between rows so the cardboard underneath becomes less visible.
As you go, alternate different colors and printed designs. Mixing the patterns helps create a balanced appearance rather than leaving one section looking too plain or too crowded.
Take a moment every few rows to look at the tree from different angles. This makes it easier to spot uneven areas while you can still adjust them.
Step 8: Follow the Shape of the Cone
As you move toward the top, the cone naturally becomes narrower. The rolled tubes will need to sit closer together as the available space decreases.
Rather than cutting the tubes to force them into position, allow the natural arrangement and slight overlapping to follow the shape of the cone.
Keep checking that the paper pieces are firmly attached and that the overall silhouette remains tapered like a traditional Christmas tree.
Step 9: Cover the Top Section
When you reach the upper portion, choose some of the narrowest and shortest tubes you have made.
Attach them carefully around the remaining exposed cardboard, bringing the pieces close together as you work toward the pointed top.
This area may take a little more patience because there is less room to position the tubes. Use small amounts of hot glue and hold each piece in place until it is secure.
The rolled card tubes gradually cover the cone and create the Christmas tree shape.
Step 10: Fill Any Visible Gaps
Take a slow look around the entire tree. Check the base, middle, and upper sections for any small openings where the cardboard is still visible.
Use your extra rolled tubes to fill these spaces. Smaller pieces are especially helpful around the narrow top, while longer tubes can be used to cover gaps closer to the base.
A little extra attention at this stage makes the finished decoration look fuller and more polished.
Step 11: Straighten and Finish the Tree
Allow the hot glue to cool completely before handling the decoration.
Gently adjust any tubes that look crooked or slightly out of place. You can nudge them into a neater position so the tree has an even shape from every side.
Avoid pulling on the paper pieces, since this could loosen the glue or damage the rolled cards.
Step 12: Find a Place to Display It
Once everything is secure, your recycled Christmas card tree is ready to display.
Place it on a mantel, tabletop, bookshelf, or holiday sideboard where the different card designs can be seen. Because the decoration has interesting details all around, it looks especially nice when it can be viewed from several directions.
The finished Christmas tree makes a colorful handmade addition to holiday decorations.
Variations & Tips
The basic design is easy to personalize. A few small changes in color arrangement, cone size, or paper selection can give each tree its own character.
Create a coordinated color palette: If you prefer a more organized appearance, sort the cards before rolling them. You could use mostly red designs around the bottom, green through the middle, and snowy whites or gold details near the top. This creates a layered look while still allowing the original artwork to show.
Choose cards with suitable thickness: Sturdier greeting cards usually hold their shape well once rolled. If a particular card keeps opening, apply a little additional glue along the final edge and hold it closed for a few extra seconds.
Make extra paper tubes: Preparing 8 to 12 additional tubes is a useful way to avoid running short. Keep them nearby while attaching the rows so you can fill small gaps as they appear.
Experiment with cone heights: An 8-inch cone makes a smaller centerpiece that works well on a side table or shelf. A 12-inch cone creates a taller decoration that is easier to notice on a mantel or holiday display.
Use different Christmas card designs: Cards with snowflakes, trees, ornaments, winter scenes, and traditional holiday illustrations can all contribute something interesting to the finished surface.
Make a matching group: Instead of making just one tree, create two or three using cones of different heights. Displaying them together gives a mantel or tabletop a more complete holiday arrangement.
Work in small sections: Hot glue sets quickly, so avoid covering the entire cone with adhesive at once. Applying glue to a small area at a time gives you more control over the placement of each tube.
Protect your work surface: Place a protective mat or scrap cardboard underneath the cone while using the hot glue gun. This makes cleanup easier and protects your table from stray adhesive.
Creative Ways to Display Your Recycled Christmas Card Tree
After all that rolling and gluing, it’s worth finding a spot where the finished decoration can be appreciated.
- On a holiday mantel: Place the tree between candles, greenery, or other small seasonal decorations.
- As a tabletop centerpiece: Use it as part of a Christmas display on a dining room sideboard or entryway table.
- On a bookshelf: A small tree adds a festive detail without taking up much space.
- In a group of handmade trees: Combine different cone heights to create a little collection of recycled Christmas decorations.
- Beside framed holiday photos: The colorful card artwork makes a lovely companion to family pictures and other seasonal keepsakes.
You can also use the colors of your finished tree as inspiration for the rest of your holiday display. A tree made mostly with red and gold cards, for example, would look lovely with warm-toned ornaments and simple greenery.
Frequently Asked Questions
Can I use Christmas cards that are not exactly 5 x 7 inches?
Yes. Cards that are similar in size can work well. Slight differences in dimensions may create tubes of different lengths, but those shorter or longer pieces can be useful when filling different areas of the cone.
How many Christmas cards do I need?
The project uses approximately 60 cards to cover a 10- to 12-inch cone. Having an additional 8 to 12 cards available is helpful if you want extra tubes for filling small gaps.
Can I use old Christmas postcards instead of folded cards?
Yes, provided the paper is sturdy enough to roll and hold its shape. Thinner paper may need a little more care when rolling and gluing.
Do I need a wooden skewer to roll the cards?
A wooden skewer is useful because it helps create narrow, consistent tubes. If you don’t have one, you can experiment with another thin rolling tool, as long as it is easy to slide out once the paper is rolled.
Can I use regular craft glue instead of a hot glue gun?
A hot glue gun is recommended for attaching the tubes to the cardboard cone because it sets quickly and helps hold the paper in position. Regular craft glue may take longer to dry, making it more difficult to keep the tubes in place while building the rows.
Why are some of my paper tubes coming loose?
This can happen if the paper wasn’t secured tightly enough or if there wasn’t enough glue along the final edge. Add a little more glue to the loose flap, press it closed, and allow it to set before attaching the tube to the cone.
Can I make a larger Christmas card tree?
Yes. You can choose a taller or wider cardboard cone, but keep in mind that a larger base will require more rolled tubes. Prepare additional cards so you have enough material to cover the entire surface.
Can children help with this project?
Children can help sort the cards by color and choose which designs to use. The rolling and arranging can also be a fun activity with supervision. However, an adult should handle the hot glue gun because the adhesive can cause burns.
Can I decorate the finished tree with extra ornaments?
You can, as long as the decorations are lightweight enough not to pull the paper tubes away from the cone. Small decorative details can be added, but the colorful rolled cards already provide plenty of visual interest.
Final Thoughts
Turning old Christmas cards into a little decorative tree is a lovely way to give familiar holiday memories another purpose. Instead of throwing away cards that have been saved over the years, you can use their colors, patterns, and illustrations to create something new for your home.
What I enjoy most about this project is the simple process. Rolling each card, arranging the tubes, and watching the cone gradually take shape makes for a satisfying afternoon craft. The finished decoration has plenty of texture and character, and every tree will be a little different depending on the cards you choose.
Make one for your own mantel, create a few in different sizes, or enjoy the project with family during the holiday season. It’s an inexpensive, creative way to decorate while making use of something you might otherwise have put away or thrown out.