
DIY Farmhouse Clothespin Planter: Turn a Tuna Can Into Rustic Decor
Sometimes the prettiest home decor starts with something you already have in the kitchen drawer or recycling bin. An empty tuna can, a handful of wooden clothespins, and a little hot glue are all you need to create a charming farmhouse-style planter without spending much money.
This simple DIY project gives an ordinary metal can a completely different look. The wooden clothespins add natural texture and a warm, vintage-inspired finish that works beautifully with farmhouse, rustic, cottage, and country-style decor. It is also a fun way to reuse an everyday container instead of throwing it away.
Once finished, your clothespin planter can hold a small potted plant, faux greenery, or a seasonal decorative arrangement. Place it on a kitchen shelf, a dining table, or an entryway console to add a handmade touch to your home.
Farmhouse Clothespin Planter
Materials
- 1 empty, clean silver tuna can
- Approximately 40 wooden clothespins
- Hot glue gun and glue sticks
- 1 small potted plant or faux greenery
Optional supplies:
- White paint or wood stain
- Small paintbrush
- Decorative ribbon or twine
Directions
Step 1: Prepare the Tuna Can
Start with an empty tuna can and wash it thoroughly with warm, soapy water. Remove the label and any remaining adhesive, then dry the can completely before decorating it.
Check the rim carefully to make sure there are no sharp edges. If the edge is damaged or sharp, choose a safer container rather than risking a cut while handling the planter.
Step 2: Prepare the Clothespins
Gather approximately 40 wooden clothespins and arrange them within easy reach. The exact number you need will depend on the size of the can and the width of the clothespins.
If you want to change the color, paint or stain the clothespins before attaching them. Allow them to dry completely so the finish does not interfere with the glue.
Step 3: Apply the Hot Glue
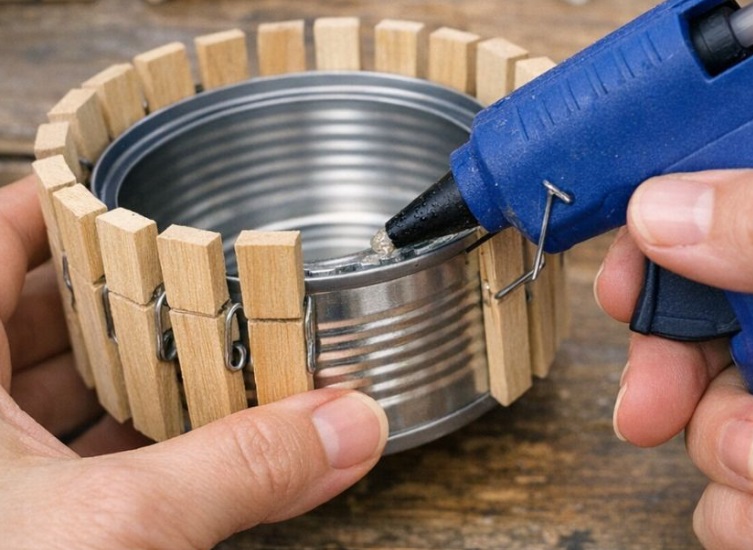
Using a hot glue gun, apply a small amount of glue to the flat side of one wooden clothespin. Work carefully and avoid touching the hot glue or the metal tip of the gun.
Step 4: Attach the First Clothespin
Press the glued side of the clothespin against the outside of the tuna can. Position it vertically, with its top aligned neatly with the upper edge of the can.
Hold it in place until the glue begins to set. Keep the clothespin straight so the finished planter has an even, tidy appearance.
Step 5: Continue Around the Can
Repeat the process with the remaining clothespins, placing them side by side around the entire circumference of the can.
Keep the spacing consistent and check your progress as you work. Approximately 40 clothespins should be enough for many small tuna cans, but you may need more or fewer depending on their size.
If you notice a gap near the end, adjust the spacing slightly rather than forcing the final clothespin into place.
Step 6: Let the Glue Dry
Once all the clothespins are attached, allow the glue to cool and dry completely according to the glue manufacturer’s instructions.
Gently check that the clothespins are secure before moving the planter. If any pieces feel loose, add a small amount of glue and allow it to set again.
Step 7: Add Your Plant
Place a small potted plant inside the decorated can, or use faux greenery for a low-maintenance display.
For live plants, keep the plant in its own nursery pot or a suitable waterproof inner container. The metal can should be treated as a decorative outer cover rather than a direct planting pot unless it has been properly prepared for drainage and moisture.
Your farmhouse clothespin planter is now ready to display.
Variations and Tips
Try a classic whitewashed finish. A light coat of white paint can give the clothespins a weathered farmhouse appearance. For a more natural look, leave the wood unfinished or apply a suitable wood stain before assembly.
Use colorful clothespins. Soft sage green, pale blue, cream, or muted yellow can give the planter a cheerful cottage-style look. Choose shades that complement the room where you plan to display it.
Add decorative twine. A piece of jute twine or a simple ribbon around the middle can add another rustic detail. Keep any decoration away from the plant’s foliage and watering area.
Adjust the size. You can use a different clean metal can or another sturdy container, provided the clothespins fit around it neatly. Larger containers will generally require more clothespins.
Choose the right greenery. Faux eucalyptus, small artificial flowers, and seasonal greenery work well for decorative arrangements. If you prefer a live plant, select one that suits the available light and keep excess moisture away from the wooden clothespins.
Protect the wood from moisture. Wooden clothespins can warp or deteriorate when repeatedly exposed to water. Use a removable inner pot and wipe up spills promptly to help the planter last longer.
Use hot glue carefully. Hot glue guns can cause burns, so work on a protected surface and keep the tool away from children and pets while it is hot. Follow the manufacturer’s safety instructions.
Where to Display Your Farmhouse Planter
This little planter is versatile enough to fit into several areas of the home.
- Kitchen: Display it on a shelf or windowsill with faux greenery or a small plant in an inner pot.
- Dining table: Use it as part of a rustic centerpiece alongside candles and natural textures.
- Entryway: Place it on a console table to add a welcoming handmade accent.
- Living room: Pair it with wooden trays, neutral ceramics, or other vintage-inspired accessories.
- Seasonal displays: Change the greenery throughout the year to match spring, summer, autumn, or winter decor.
If you display it near a window, make sure the plant receives suitable light without exposing the wooden clothespins to repeated splashes of water.
Final Thoughts
This DIY farmhouse clothespin planter is a simple, affordable way to turn an ordinary tuna can into something decorative and useful. With about 40 wooden clothespins, a hot glue gun, and a few minutes of hands-on work, you can create a rustic accent that fits beautifully into a cozy home.
Whether you choose natural wood, a soft whitewashed finish, or a pop of color, the finished piece can be customized to match your style. Add a small potted plant or faux greenery, find a spot to display it, and enjoy a little handmade farmhouse charm.